Shark Snack Cups-Fun & Easy Treat Recipe
Shark Snack Cups are about to become your new obsession, and I’m so excited to share this recipe with you! There’s something incredibly satisfying about these little edible marvels, perfect for parties, a fun afternoon treat, or even a whimsical dessert. What’s not to love about a bite-sized explosion of flavor, presented in such an adorable way? People flock to these Shark Snack Cups because they’re not just delicious; they’re an experience. They’re incredibly versatile, allowing for endless customization with your favorite candies and colors, making each batch uniquely yours. What truly sets these Shark Snack Cups apart is the magical transformation of simple ingredients into something truly spectacular. Get ready to dive into a world of sweet surprises!
Why You’ll Love These Shark Snack Cups
A Delightful Treat for All Ages

Shark Snack Cups
Are you ready to dive into a deliciously fun treat that’s perfect for a summer party, a kids’ birthday, or just a whimsical afternoon snack? Get ready to make a splash with these adorable and incredibly easy Shark Snack Cups! These are guaranteed to be a hit with everyone, from the littlest ocean explorers to the grown-ups who secretly love a bit of fun with their dessert. We’re talking about a creamy, dreamy base with a hint of fruity sweetness, all topped off with a playful gummy shark. They’re so simple, you might even be able to get the kids involved in making them – and they’ll have a blast! Let’s get our fins wet and create some ocean-themed magic.
Ingredients:
- 1 tub (8 oz.) COOL WHIP Whipped Topping, thawed
- 2 containers (6 oz. each) low-fat vanilla yogurt
- 1/4 cup boiling water
- 1 (3 oz.) pkg. Jell-O mix (any flavor you like – blue raspberry or berry blue are great for an ocean look!)
- 1/2 cup Graham cracker crumbs
- Individual serving cups/dishes
- Gummy sharks
- Optional: Parasol picks
Creating Your Ocean Base
The magic of these Shark Snack Cups starts with creating a light and fluffy ocean-like base. It’s a simple process that transforms just a few ingredients into something truly special. First, we’ll get our Jell-O ready to go.
Step 1: Prepare the Jell-O Mixture
In a medium-sized bowl, carefully pour in the boiling water. Add the Jell-O mix to the boiling water. Now, this is where you get to be the whisking champion! Stir the Jell-O and water together vigorously for about 2 minutes, or until the Jell-O powder is completely dissolved. You want to make sure there are no little grainy bits left at the bottom of the bowl. This dissolved Jell-O will act as a binder and add a subtle sweetness and color to our creamy mixture. It’s important to let this Jell-O mixture cool down slightly before moving to the next step. We don’t want it to melt our other ingredients! Let it sit at room temperature for about 10-15 minutes, giving it a gentle stir every now and then.
Step 2: Combine the Creamy Elements
Once your Jell-O mixture has cooled a bit, it’s time to bring in the other stars of our show. In a separate, larger bowl, gently fold together the thawed COOL WHIP Whipped Topping and the two containers of low-fat vanilla yogurt. The COOL WHIP will provide that signature light and airy texture, while the vanilla yogurt adds a lovely creaminess and a touch of tang. Be gentle when you’re mixing these; you want to keep the airiness of the COOL WHIP intact. Stir just until they are well combined and you have a smooth, uniform consistency. It will look like a beautiful, fluffy cloud.
Step 3: Introduce the Jell-O to the Creamy Base
Now for the exciting part – bringing the cooled Jell-O into our creamy concoction. Slowly and carefully pour the slightly cooled Jell-O mixture into the bowl with the COOL WHIP and yogurt mixture. Using a spatula or a whisk, gently fold the Jell-O into the creamy base. Continue to fold until everything is just combined and you see streaks of color. Don’t overmix here; some subtle marbling can actually look quite appealing, like waves in the ocean! The mixture will become slightly firmer and take on the color of your Jell-O. This is where the ocean magic really starts to happen.
Step 4: Layering the “Sand”
Before we fill our ocean cups, let’s add a little something at the bottom to mimic the sandy seabed. Spoon a thin layer of graham cracker crumbs into the bottom of each individual serving cup or dish. This not only looks cute but also adds a delightful crunch and a subtle honey-toasted flavor that complements the creamy topping beautifully. You can gently press down on the crumbs with the back of a spoon to help them stay in place, creating a stable foundation for our ocean treat. Don’t worry about making it perfectly even; a slightly uneven surface can look more natural, like real sand.
Step 5: Filling the Ocean Cups and Adding the Sharks
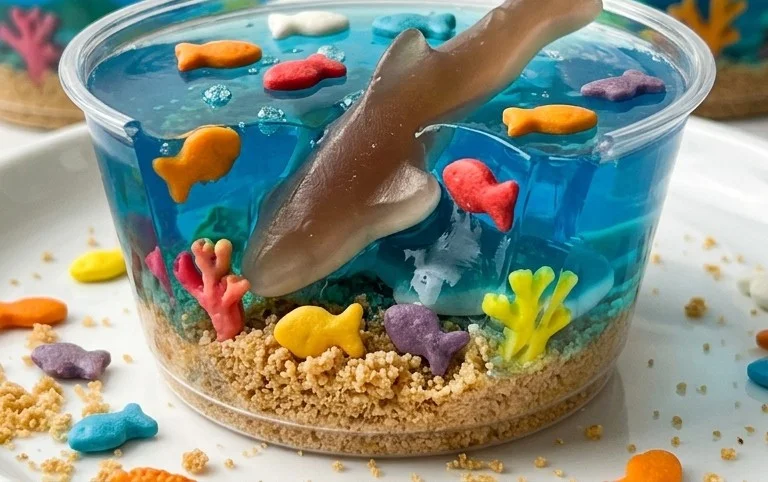
Now it’s time to assemble our Shark Snack Cups! Carefully spoon the creamy Jell-O and whipped topping mixture into each of the prepared serving cups, filling them about two-thirds to three-quarters of the way full. You want to leave enough room at the top for your gummy sharks and any optional decorations. Gently smooth the top of the mixture with your spoon or spatula. Finally, the moment we’ve all been waiting for – place one or two gummy sharks on top of each cup, letting them “swim” in their creamy ocean. For an extra touch of fun, you can insert a small parasol pick into the side of the cup or place it in the topping. Chill the Shark Snack Cups in the refrigerator for at least 30 minutes before serving. This allows the mixture to set up a little more and ensures they are perfectly cool and refreshing. Enjoy your delightful ocean adventure in a cup!
Conclusion:
There you have it – the ultimate guide to creating these delightful Shark Snack Cups! I truly believe this recipe is fantastic because it’s not only incredibly fun and visually appealing, perfect for impressing guests or just adding a splash of whimsy to your day, but it’s also surprisingly simple to make. The combination of creamy pudding, crunchy toppings, and the iconic shark fin element makes for a winning treat that appeals to both kids and adults. They are incredibly versatile, making them ideal for birthday parties, themed events, or even just a special afternoon pick-me-up. I encourage you to give this recipe a try; I’m confident you’ll love the results and the joy it brings!
For serving suggestions, these Shark Snack Cups are wonderful on their own, but consider presenting them on a platter decorated with blue cellophane to mimic water, or alongside other ocean-themed treats. As for variations, feel free to experiment with different pudding flavors like chocolate or vanilla, or swap the crushed cookies for graham cracker crumbs or even granola for added texture. You could also get creative with the candy elements, using gummy sharks or Swedish Fish for an extra aquatic touch.
Frequently Asked Questions:
Can I make these Shark Snack Cups ahead of time?
Yes, absolutely! You can prepare the pudding and the “ocean” layers a day in advance. Store them covered in the refrigerator. Add the cookie crumbs and the shark fins just before serving to prevent the crumbs from getting soggy and to keep the fins standing tall.
What kind of pudding works best?
Any instant pudding mix will work wonderfully. Vanilla or cheesecake flavors are particularly popular as they create a lovely canvas for the blue coloring and toppings. However, feel free to use your favorite flavor!
Are there any allergens to consider?
This recipe typically contains dairy (from the pudding and whipped topping) and gluten (from the cookies). You can adapt it for allergies by using dairy-free pudding and whipped topping alternatives, and gluten-free cookies or cookie crumbs.
Shark Snack Cups
Fun and easy no-bake dessert cups featuring gummy sharks swimming in a creamy, jiggly ocean.
Ingredients
-
1 tub (8 oz.) COOL WHIP Whipped Topping, thawed
-
2 containers (6 oz. each) low-fat vanilla yogurt
-
1/4 cup boiling water
-
1 (3 oz) pkg Jell-O mix
-
1/2 cup Graham cracker crumbs
-
Gummy sharks
-
Individual serving cups/dishes
-
Optional: Parasol picks
Instructions
-
Step 1
In a small bowl, dissolve Jell-O mix in boiling water. Stir until completely dissolved and let cool slightly. -
Step 2
In a medium bowl, gently fold together the thawed COOL WHIP Whipped Topping and the low-fat vanilla yogurt until well combined. -
Step 3
Slowly whisk the cooled Jell-O mixture into the whipped topping and yogurt mixture until smooth. -
Step 4
Spoon a layer of graham cracker crumbs into the bottom of each individual serving cup. -
Step 5
Carefully pour or spoon the Jell-O mixture over the graham cracker crumbs in each cup. -
Step 6
Place a few gummy sharks into the Jell-O mixture in each cup, allowing them to ‘swim’. -
Step 7
Refrigerate for at least 30 minutes, or until the Jell-O is set. Insert optional parasol picks before serving.
Important Information
Nutrition Facts (Per Serving)
It is important to consider this information as approximate and not to use it as definitive health advice.
Allergy Information
Please check ingredients for potential allergens and consult a health professional if in doubt.
